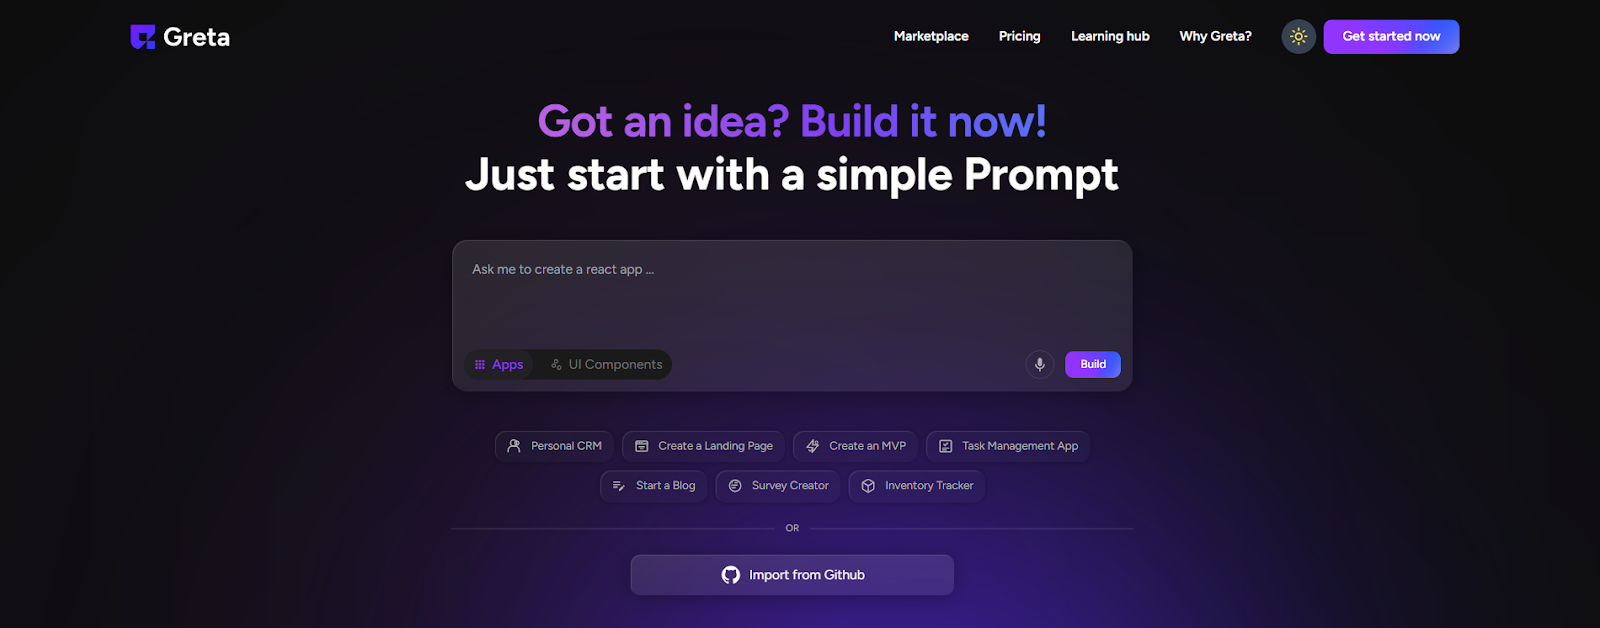
What is the Greta Marketplace?
Learn about the Greta Marketplace.
What is the Greta Marketplace?
Greta Marketplace - App Templates
Welcome to the Greta Marketplace, a creative space built for digital creators, builders, and innovators. This guide walks you step by step through how to use the marketplace—from creating and publishing app templates to discovering, purchasing, and using apps built by others.
1. What is the Greta Marketplace?
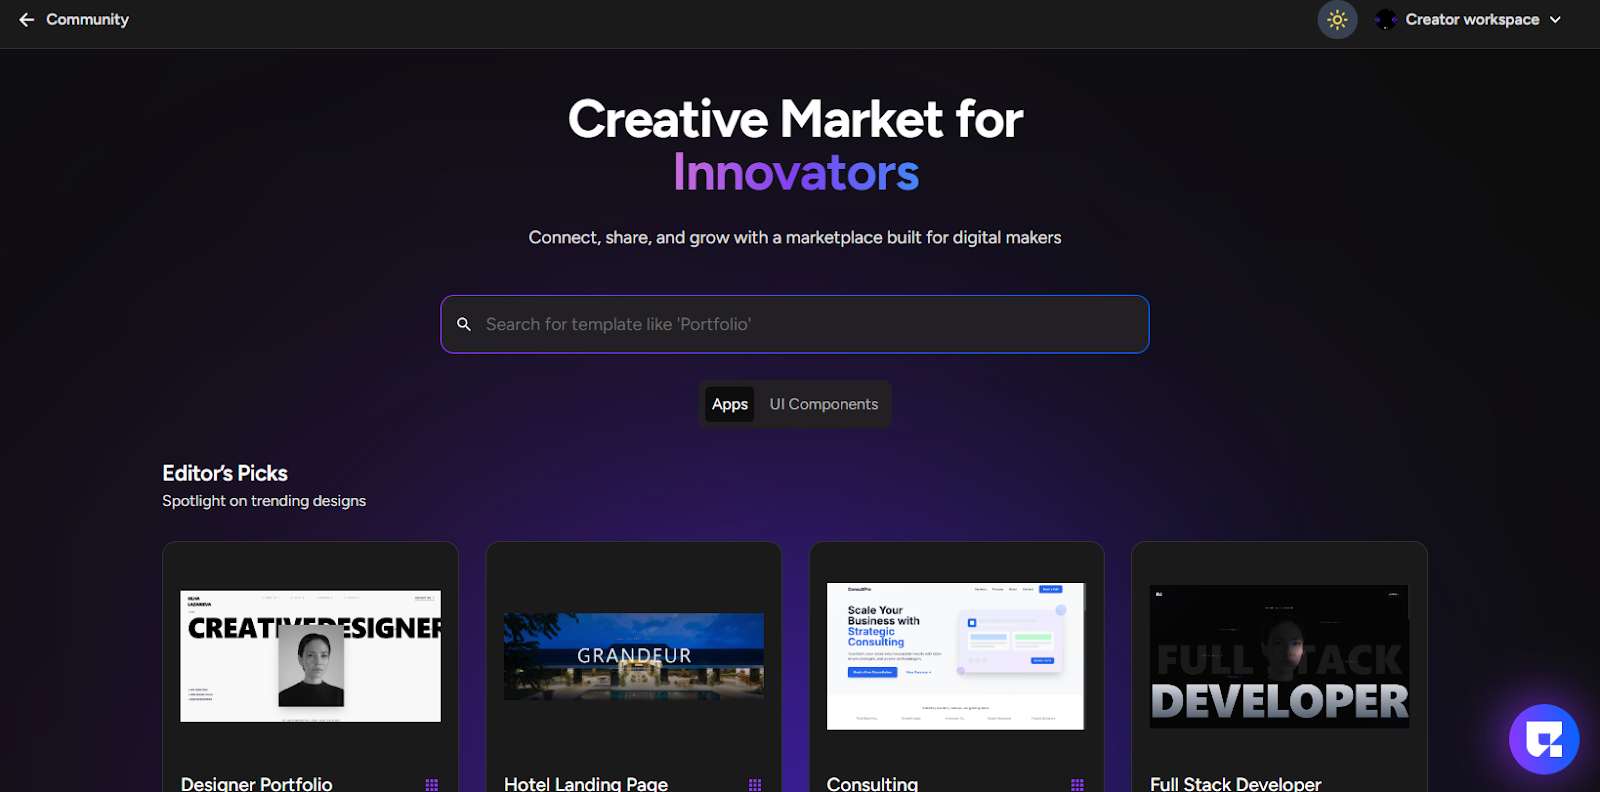
The Creative Market in Greta is a marketplace where you can:
- Build apps and UI components using Greta
- Publish them to the marketplace
- Showcase your work to the community
- Monetize your creations
- Discover, purchase, and reuse apps built by others
Other users can:
- Discover and explore published apps and UI components
- Like, comment on, share, and rate creations
- Purchase apps or UI components
- Directly use purchased items inside their own Greta apps
This helps creators grow through visibility and earnings, while helping others build faster using ready-made apps.
2. Getting Started with Greta
Step 1: Log in or Sign up
- Visit Greta
- Log in with your account
- If you’re new, sign up and complete onboarding
Once logged in, you’ll land on the Greta home page.
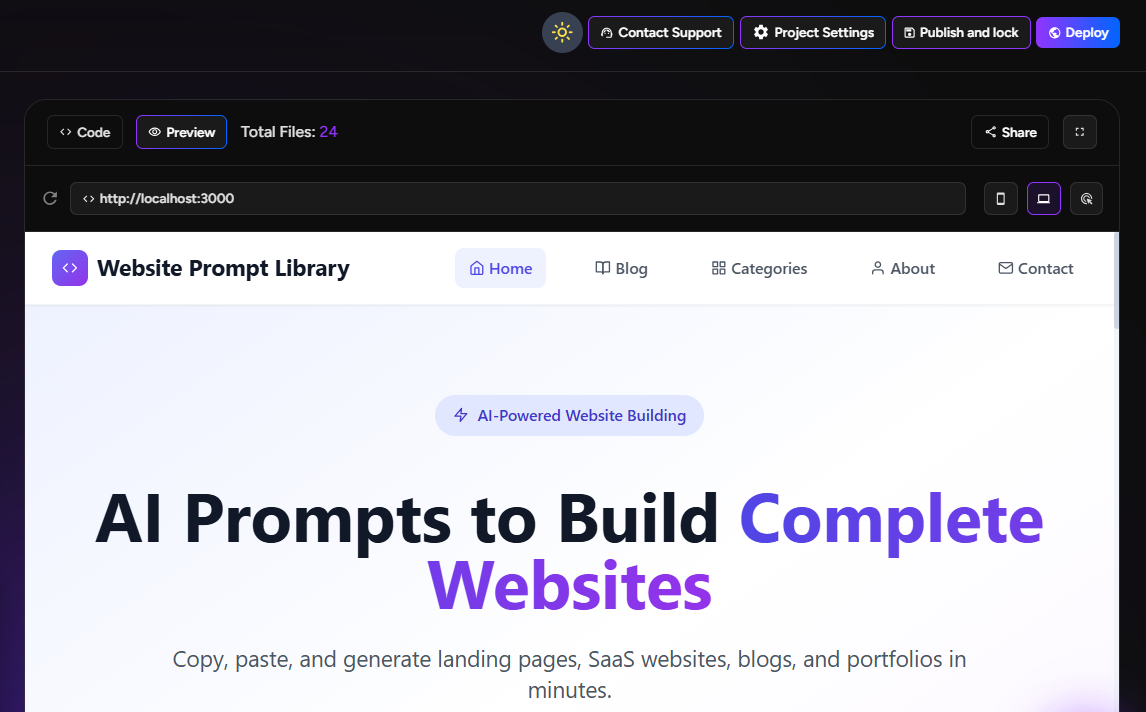
3. Creating an App or Website to Sell
Step 2: Build something extraordinary
- Use Greta to create a website, app, or UI component
- Make sure it’s complete, polished, and reusable
- Think about what others would love to use or customize
Once you’re done building, you’re ready to publish.
Learn how to create your first project on Greta and explore more in the Learning Hub
4. Locking & Publishing Your App
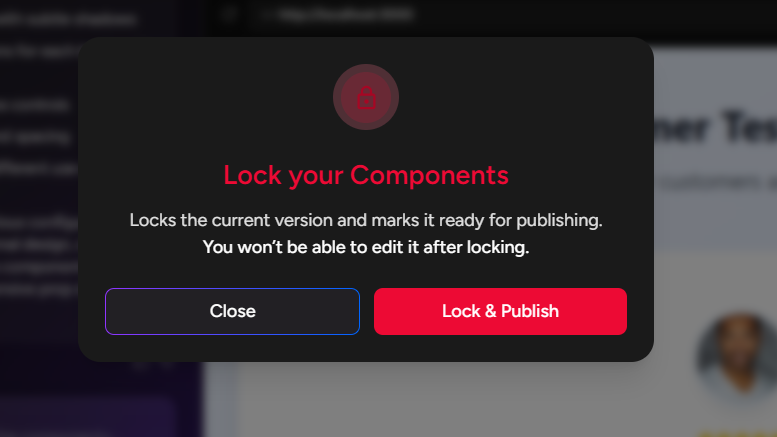
Step 3: Lock your component
1. Click the Lock button at the top-right corner of the screen
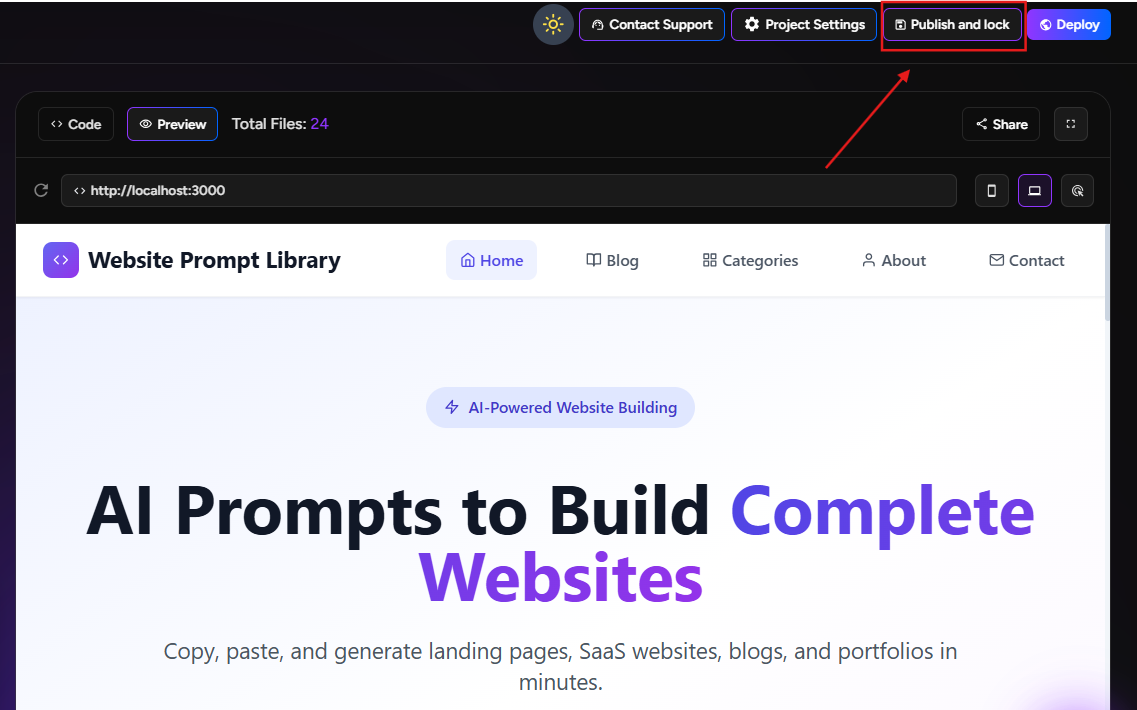
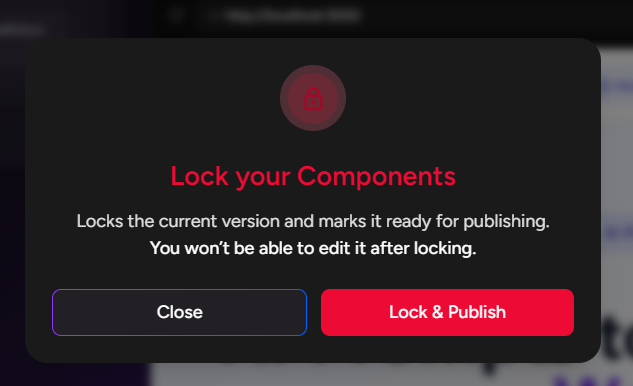
2. A popup will appear titled Lock your Components.
This action:
- Locks the current version
- Marks it ready for publishing
- Prevents further edits to this version
⚠️ Once locked, this version cannot be edited.
3. Click Lock & Publish
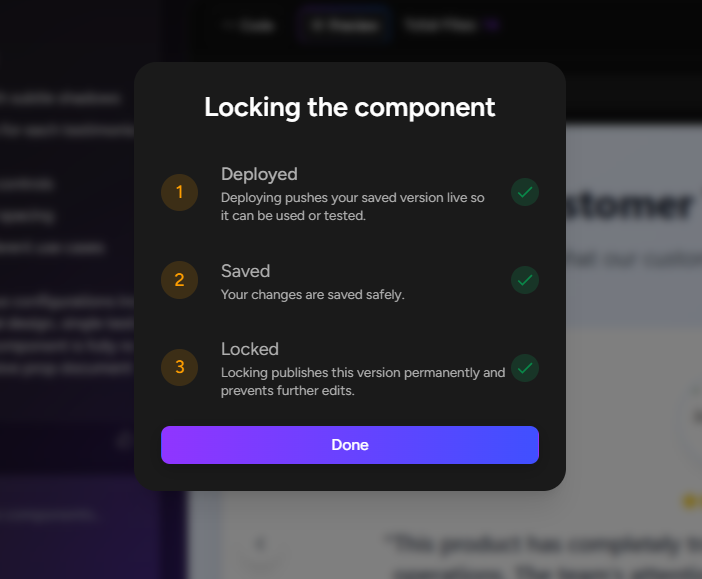
Step 4: Publishing process explained
After clicking Lock & Publish, you’ll see a progress popup:
- Deployed – Your saved version is pushed live for use/testing
- Saving – Your changes are securely saved
- Locking – This version is permanently locked and published
- Click Done once the process is complete
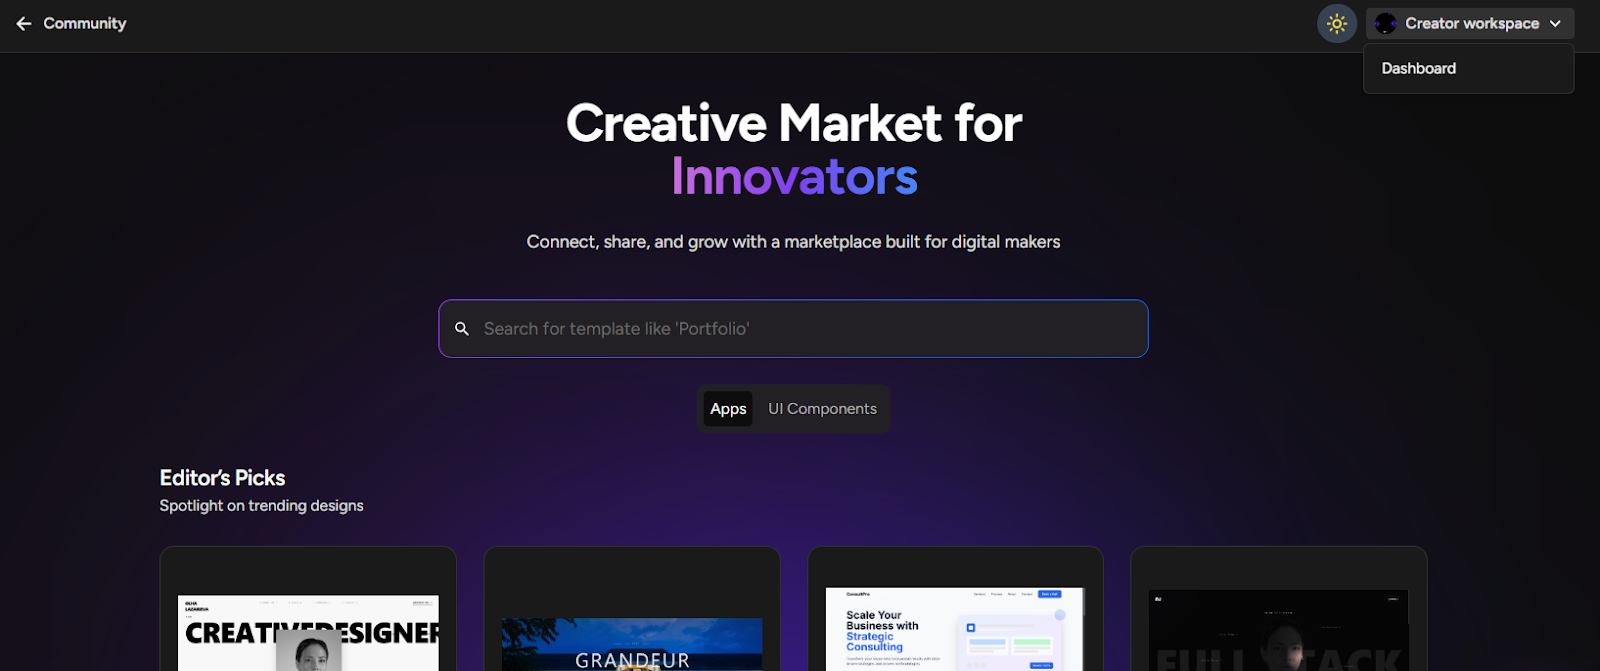
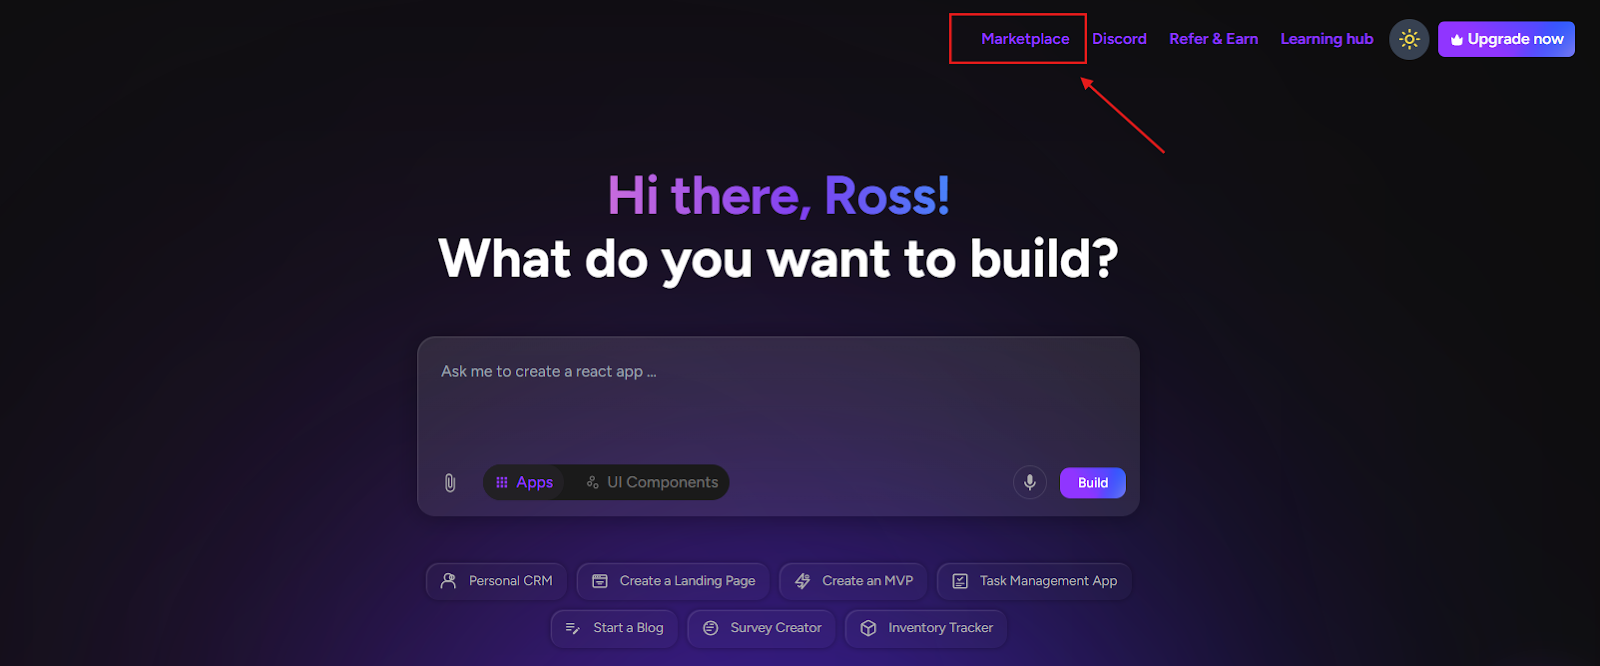
5. Accessing the Greta Marketplace
Step 5: Open the marketplace
You can access the marketplace:
1. From the landing page, click Marketplace

2. This opens the Greta Marketplace page

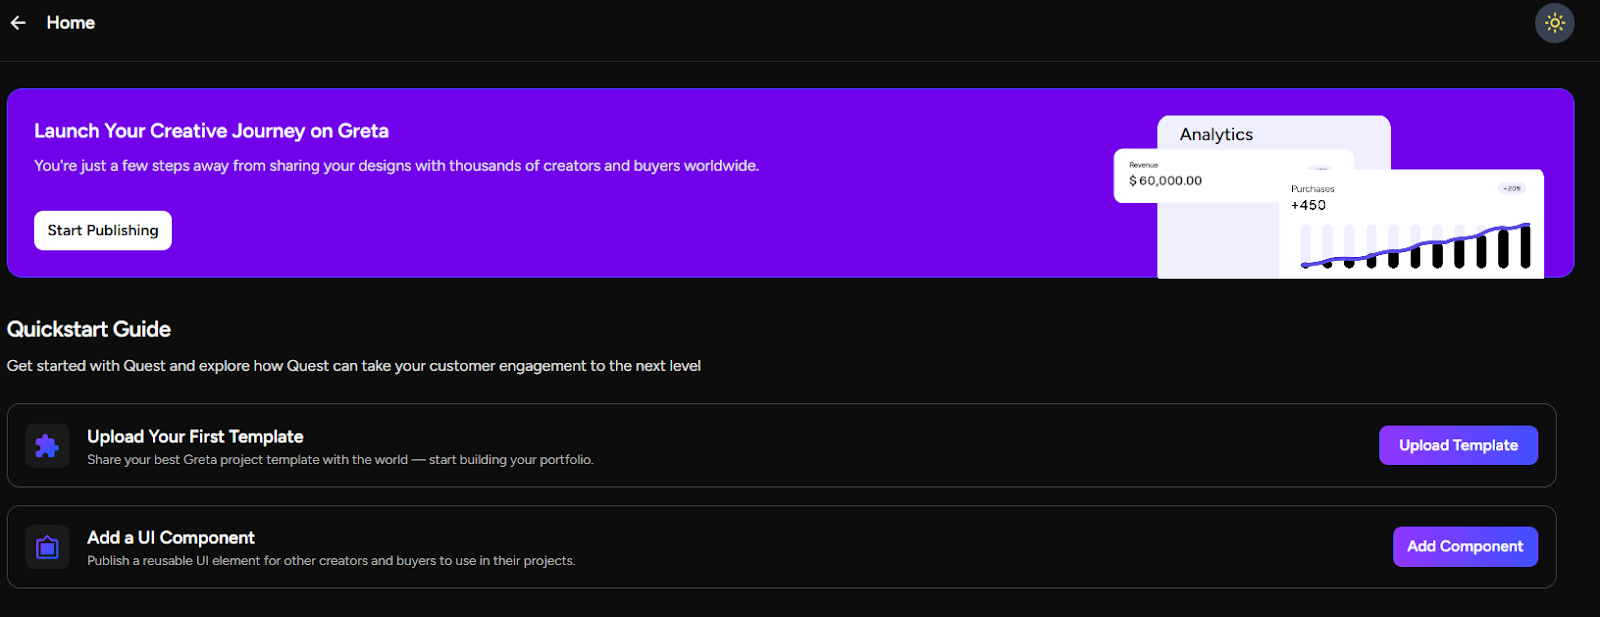
6. Creator’s Workspace & Dashboard
Step 6: Open Creator’s Workspace
- On the Marketplace page, click Creator’s Workspace (top-right)
- You’ll be taken to your Dashboard (top-right)
This dashboard shows:
Quick start guide to:
Upload UI template
7. Uploading an App Template
Step 7: Upload your template
- In the dashboard, click Upload Template
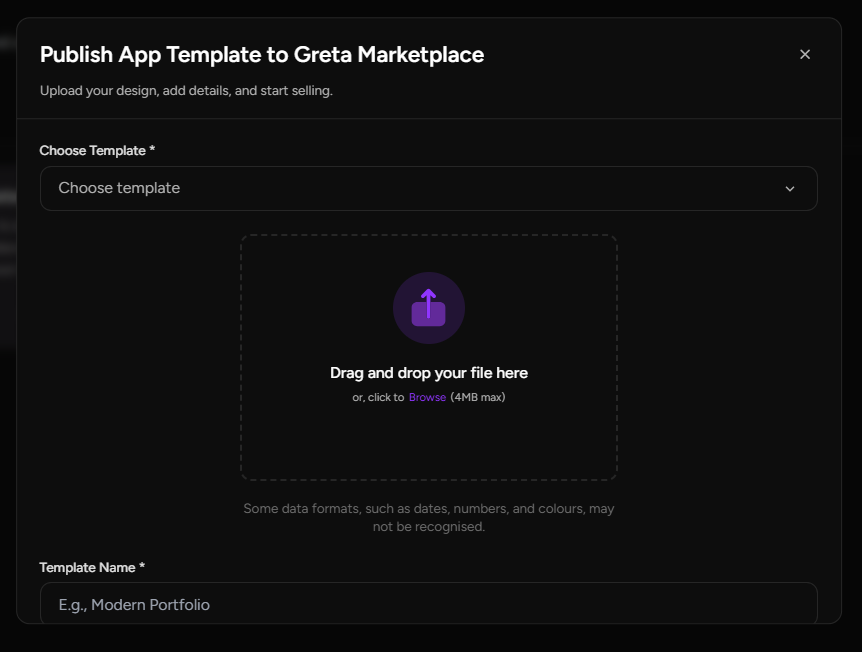
- A popup will appear: Publish App Template to Greta Marketplace
Fill in the following details:
- Choose Template:Drag & drop your file or browse to upload
Max size: 4MB - Template Name:Example: Modern Portfolio
- Short Description:A quick summary shown in the marketplace
- Prerequisites:Any required API keys, tools, or setup
- Category:Choose the most relevant category
- Pricing Category:Free (or paid, if applicable)
7. Click Publish Now
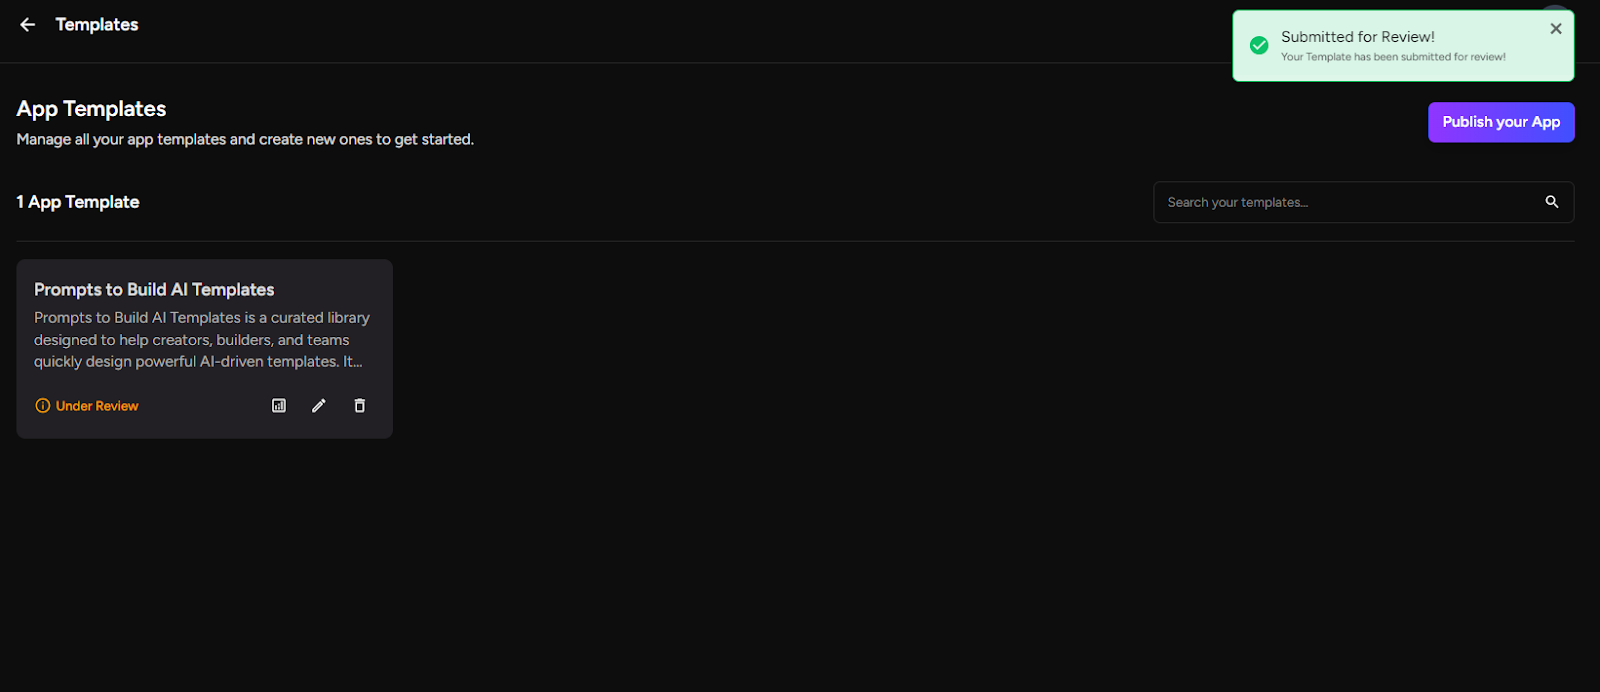
8. Review & Approval Process
Note: The review process usually takes around one week. You’ll be notified once the review is complete.
Step 8: Review status
After publishing:
- Your app goes into Under Review status
- The Greta team reviews your app for quality and usability
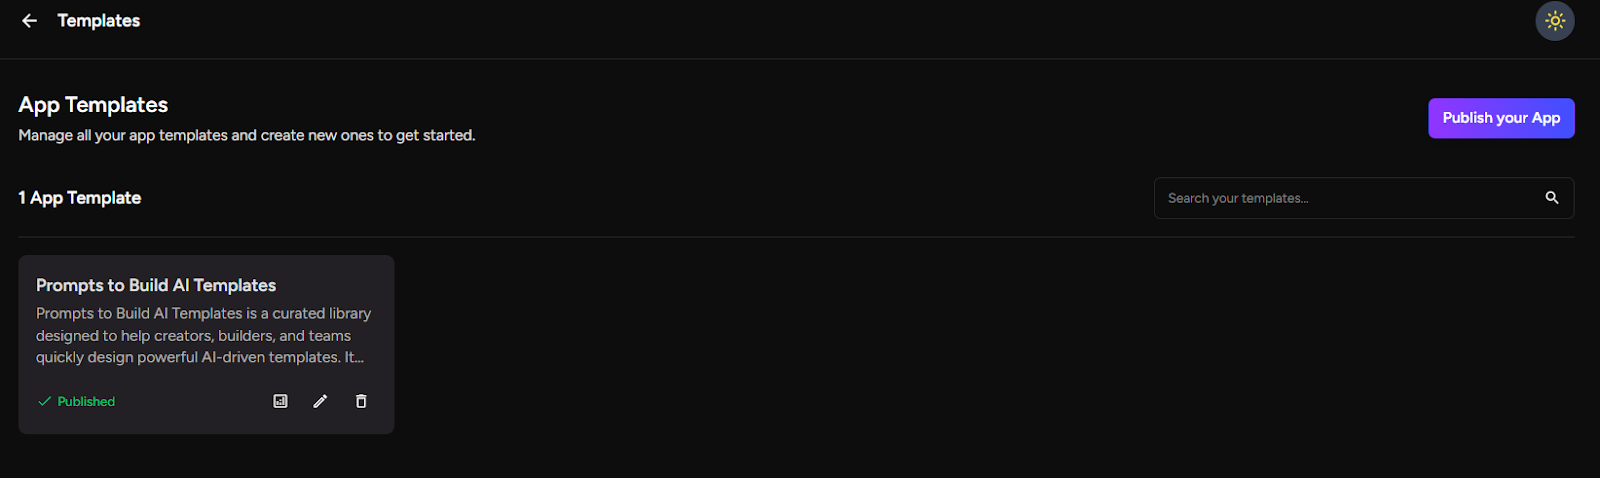
If approved:
- Your app will be published on the marketplace
If rejected:
- You’ll see the rejection reason by hovering over the status
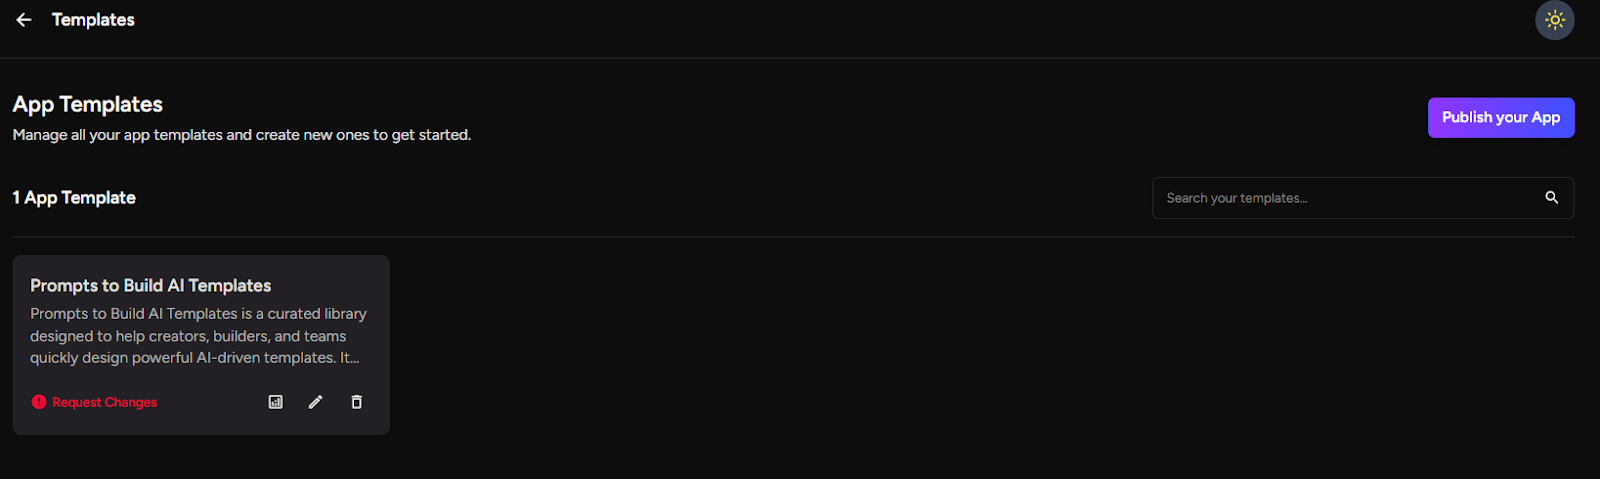
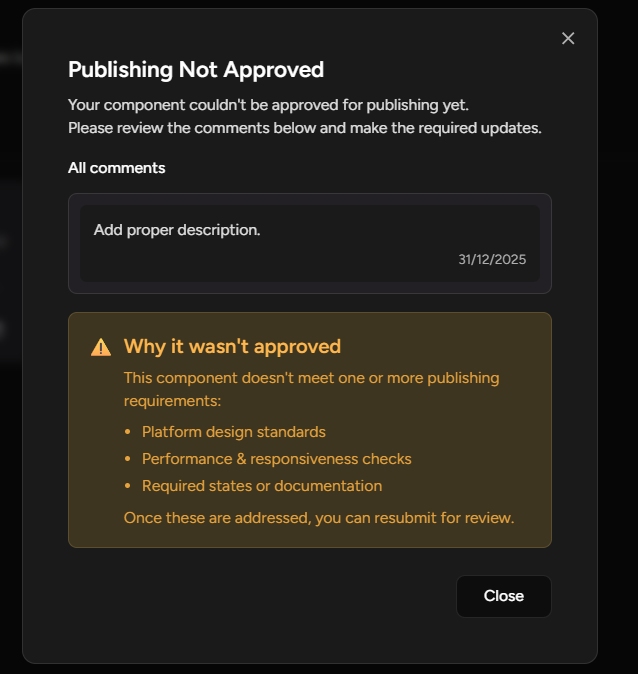
- You can make edits and resubmit for review
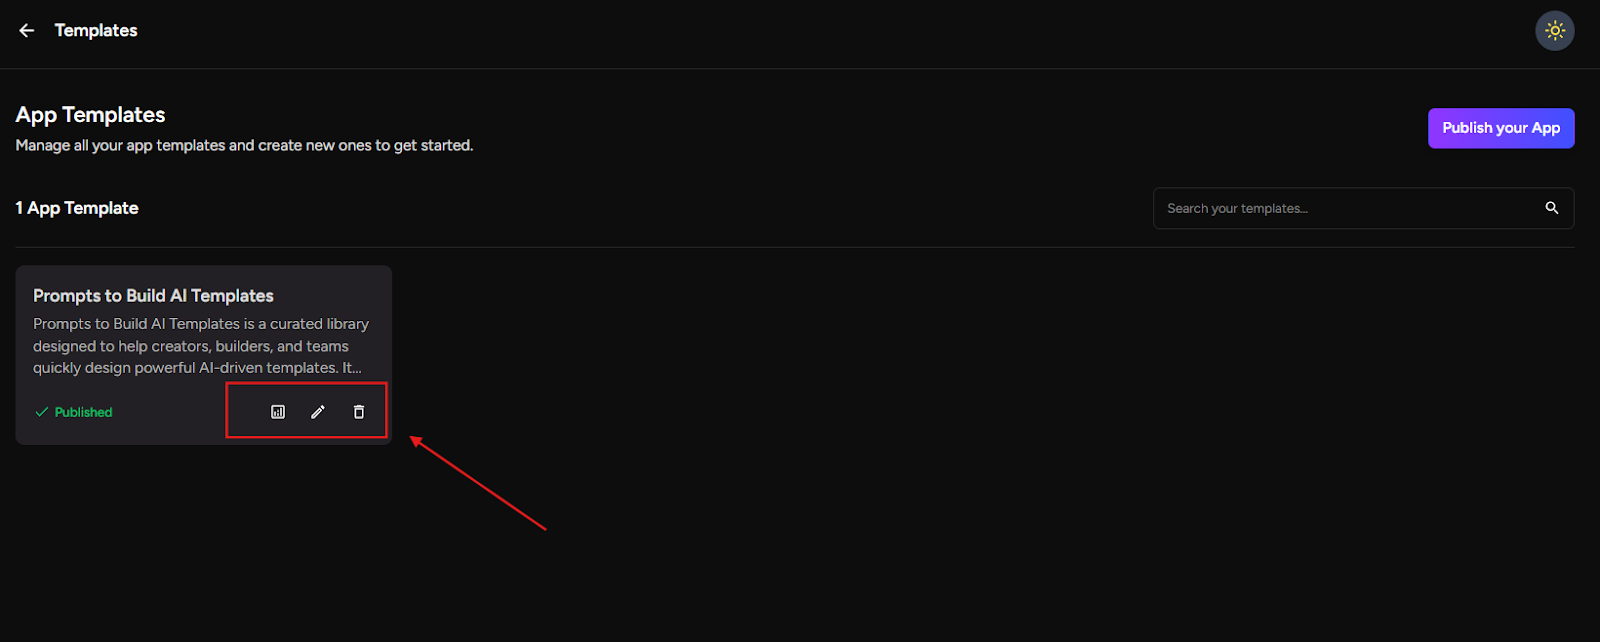
9. Managing Your Apps
Step 9: Dashboard actions
For each app in your dashboard, you’ll see three options:
- Analytics – View website/app performance and usage
- Edit – Update details or improve your app
- Delete – Remove the app from the marketplace
You can manage all your marketplace apps from this one place.
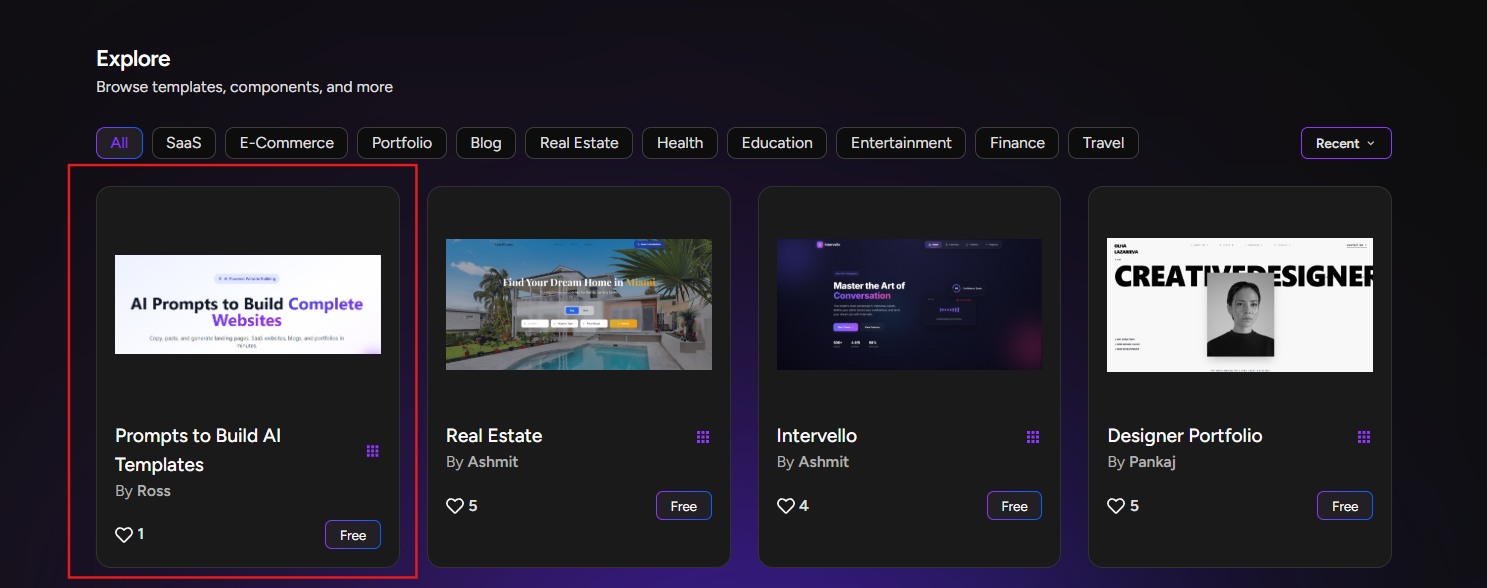
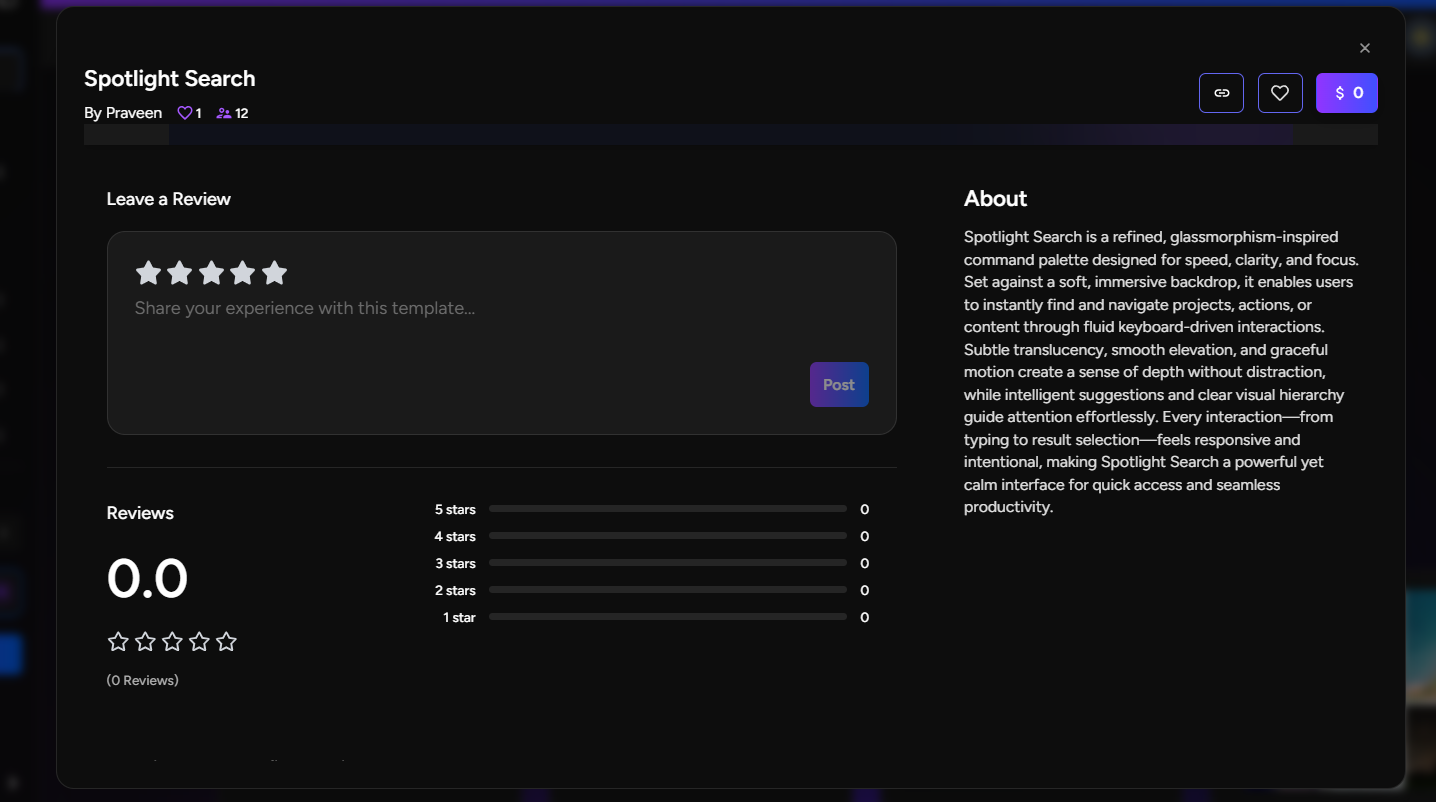
10. Discovering & Using Apps from the Marketplace
Step 10. Explore the marketplace
1. Go to the Greta Marketplace
2. Browse apps and templates created by others
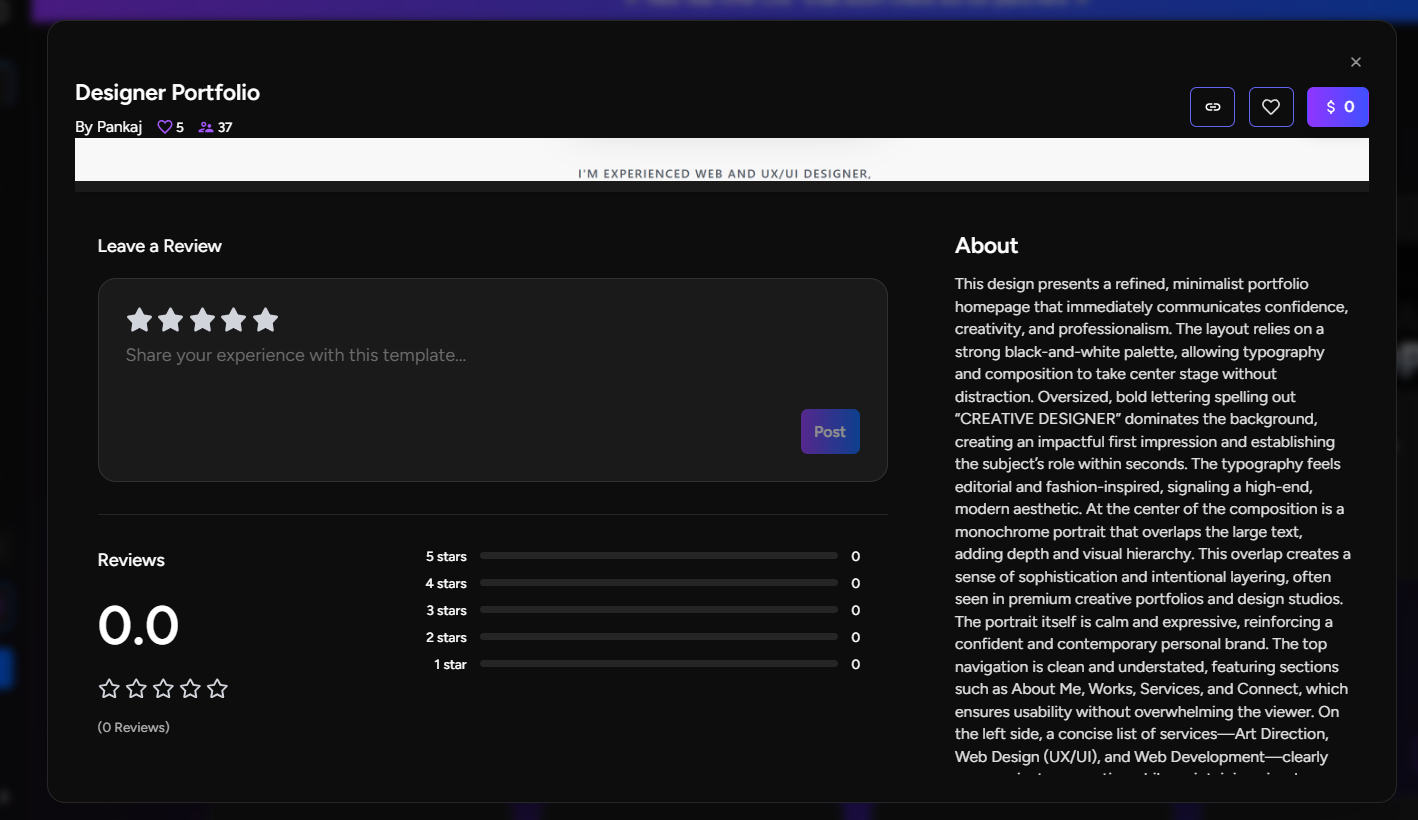
3. Click on any app to view:
Ratings and reviews
Likes and comments
You can:
- Like the app
- Rate it
- Leave a Review
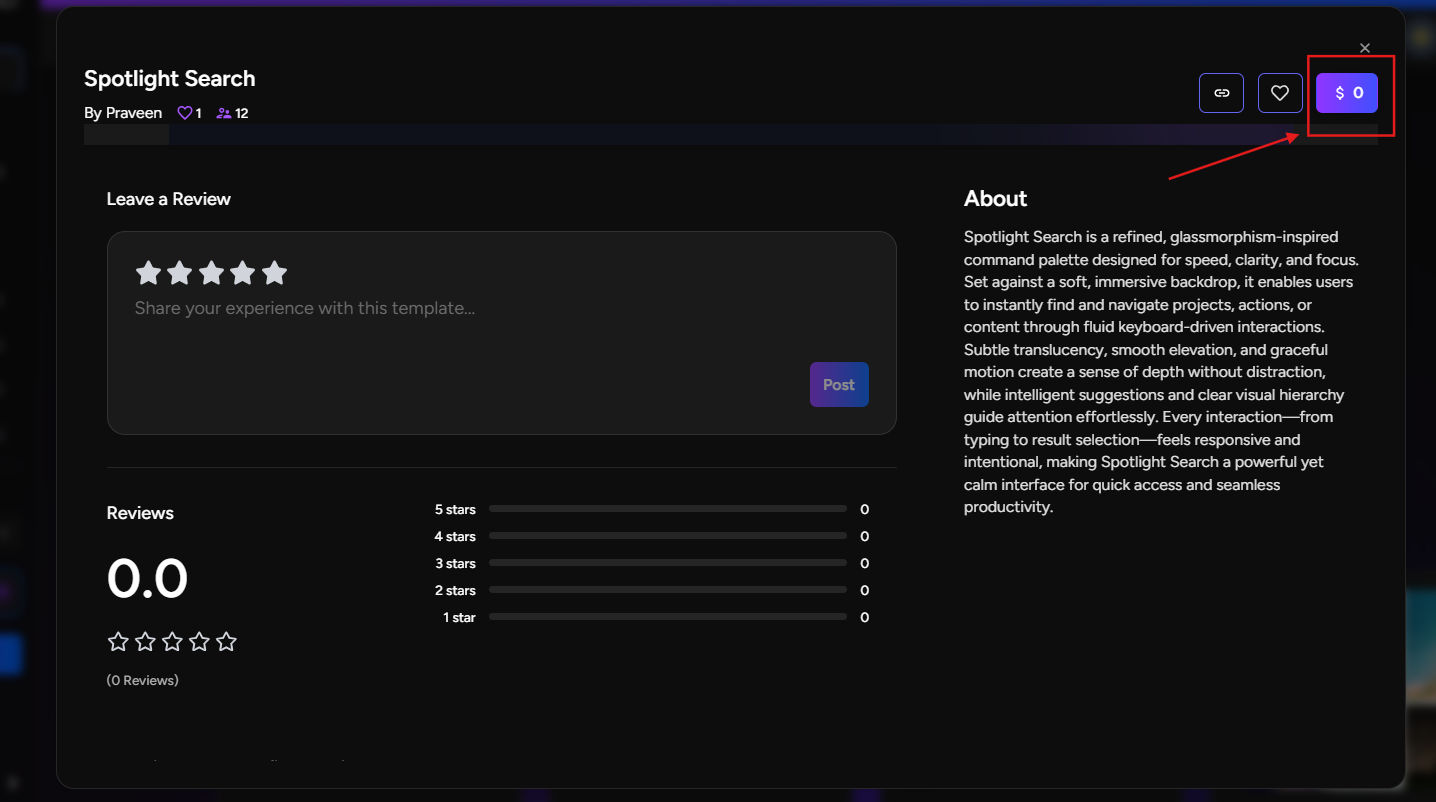
11. Purchasing & Using an App Template
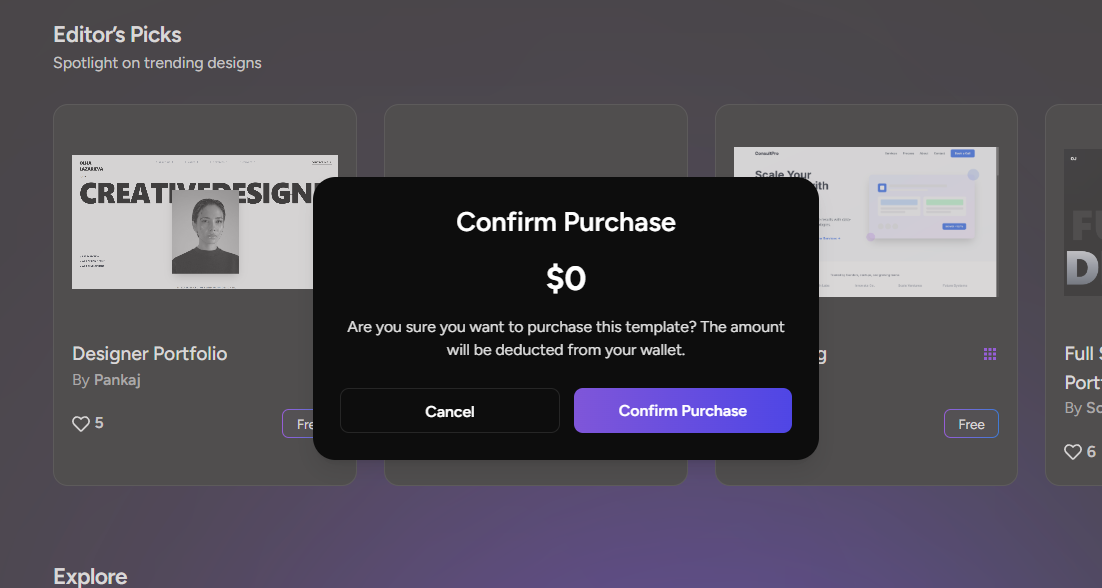
Step 11: Use an app template
1. Open the app/template you like
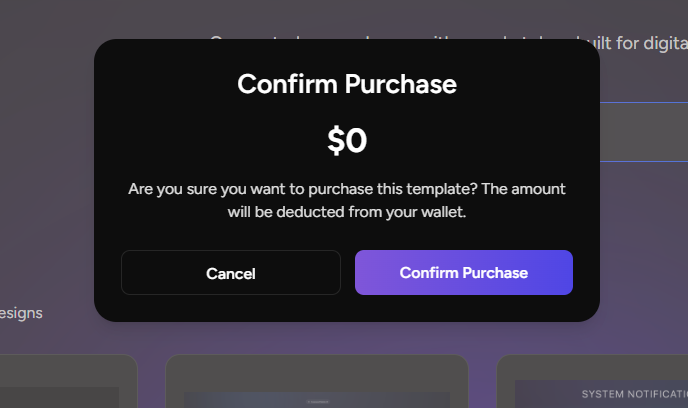
2. On the top-right corner, click the $0- purchase button
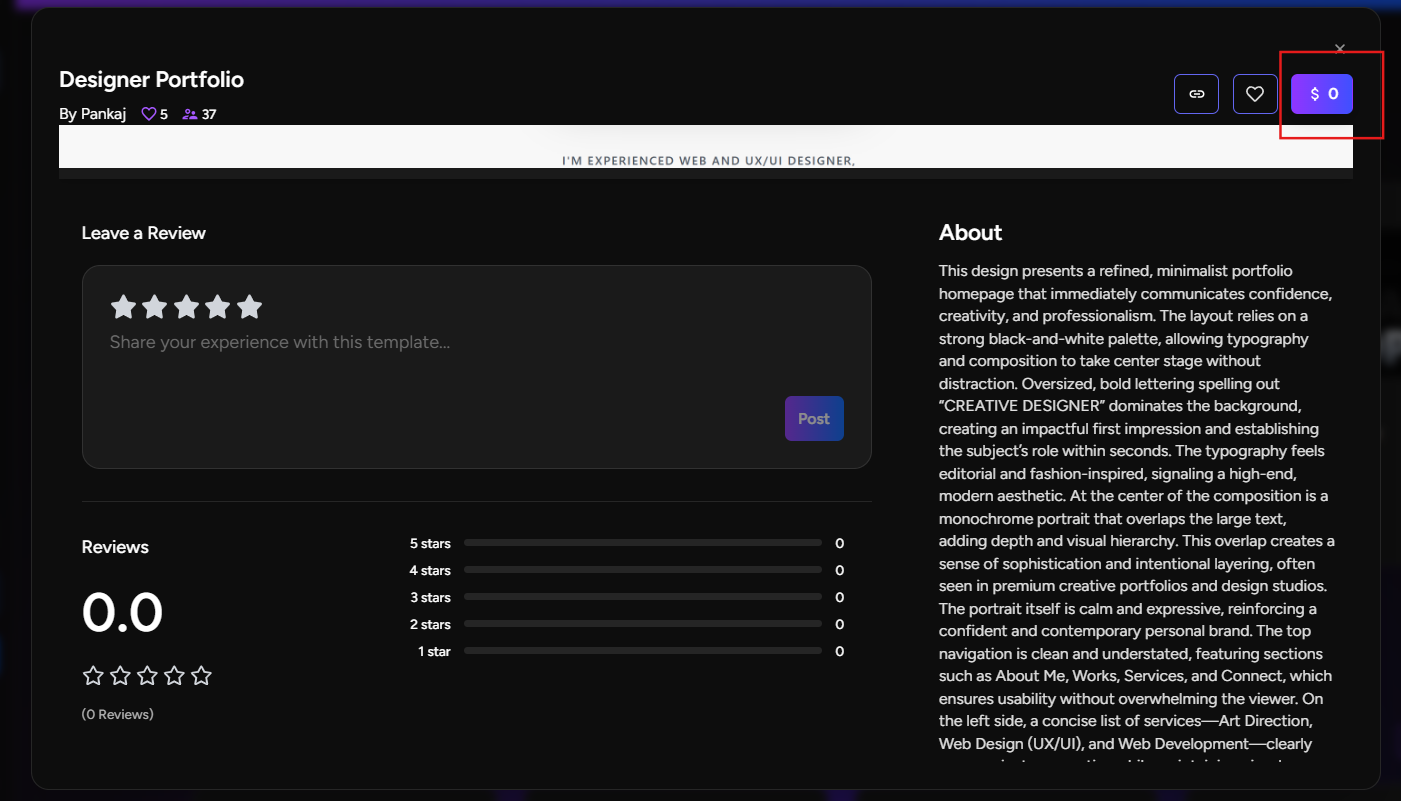
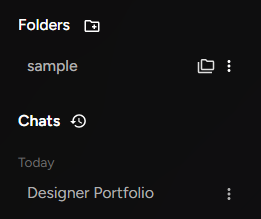
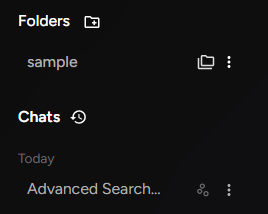
3. The app is automatically added to your History
Chat History:
From there:
- You can edit the app
- Customize it for your needs
- Use it anytime in Greta
You now have a ready-made app that you can build on instantly.
12. Final Thoughts
The Greta Marketplace is built to:
- Empower creators to showcase and monetize their work
- Help users build faster with reusable apps
- Encourage collaboration and community growth
Whether you’re creating, selling, or using apps—everything is designed to be simple, flexible, and creator-first.
Happy building with Greta.
Greta Marketplace – UI Components
This guide explains how to create, publish, and manage UI Components, on the Greta Marketplace.
1. What are UI Components in Greta?
UI Components are reusable design elements such as buttons, cards, forms, sections, or layouts that other creators can directly use inside their Greta apps.
By publishing UI components, you can:
- Share polished UI elements with the community
- Help others build faster
- Showcase your design skills
- Monetize high-quality components
2. Getting Started with Greta
Step 1: Log in or Sign up
- Visit Greta
- Log in with your account
- If you’re new, sign up and complete onboarding
Once logged in, you’ll land on the Greta home page.

3. Creating a UI Component in Greta
Step 2: Build your UI component
- Use Greta to create a website, app, or UI component
- Make sure it is:Clean and reusable
Well-structured
Ready to be used across multiple apps
Once the component is complete and tested, you’re ready to publish it.
4. Locking & Publishing Your UI Component
Step 3: Lock your component
1. Click the Lock button at the top-right corner of the screen
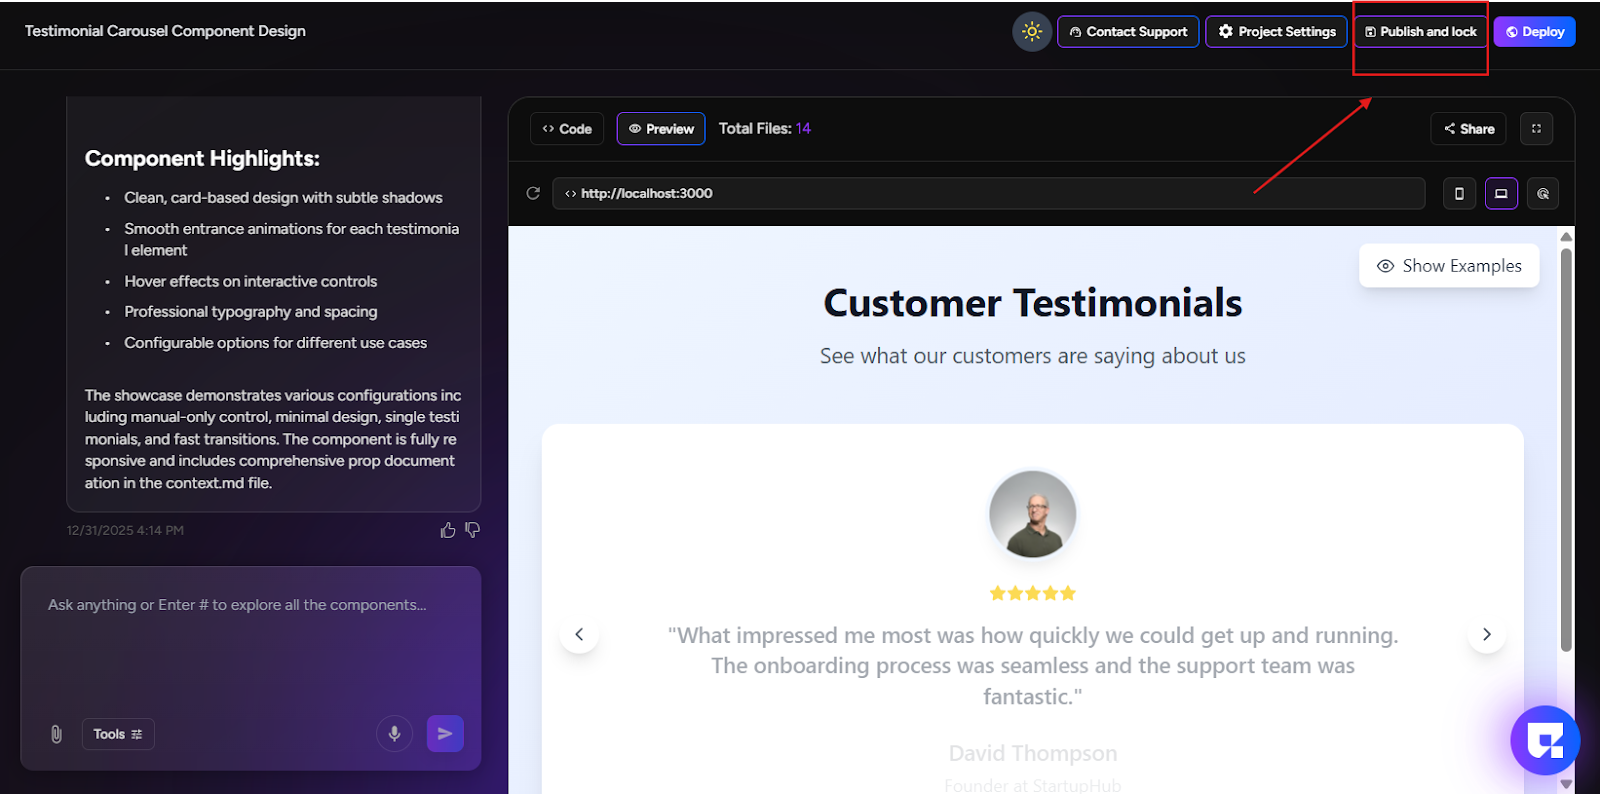
2. A popup will appear titled Lock your Components.
This action:
- Locks the current version
- Marks it ready for publishing
- Prevents further edits to this version
⚠️ You won’t be able to edit this version after locking.
3. Click Lock & Publish
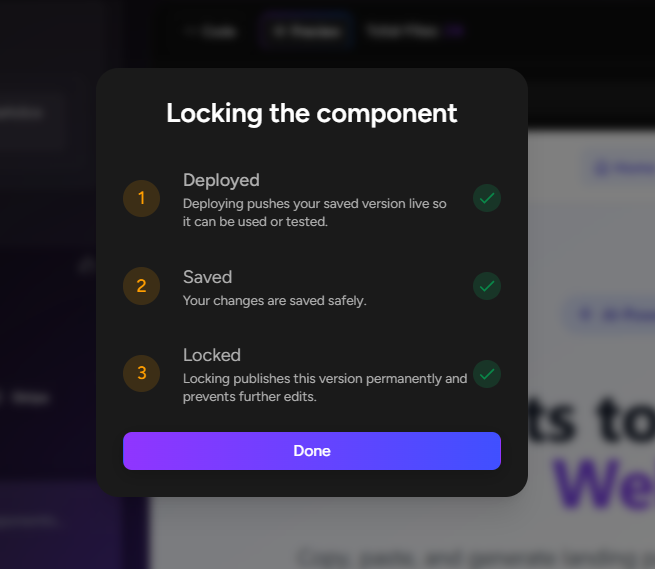
Step 4: Publishing process explained
After clicking Lock & Publish, you’ll see a progress popup:
- Deployed – Deploying pushes your saved version live so it can be used or tested.
- Saving – Your changes are saved safely.
- Locking – This version is permanently published and can no longer be edited.
- Click Done to complete the process.
5. Opening the Greta Marketplace
Step 5: Go to the marketplace
You can open the Greta Marketplace in the following way:
- Go to the Greta landing page
- At the top-right corner, click MarketplaceLocated next to Discord and Learning Hub
3. This opens the Greta Marketplace page
6. Creator Dashboard for UI Components
Step 6: Open Creator’s Workspace
- On the Marketplace page, click Creator’s Workspace (top-right)

2. You’ll be taken to your Dashboard
Quick start guide to:
Upload UI template

7. Uploading a UI Component
Step 7: Upload your UI component
- In the dashboard, click Upload UI Component
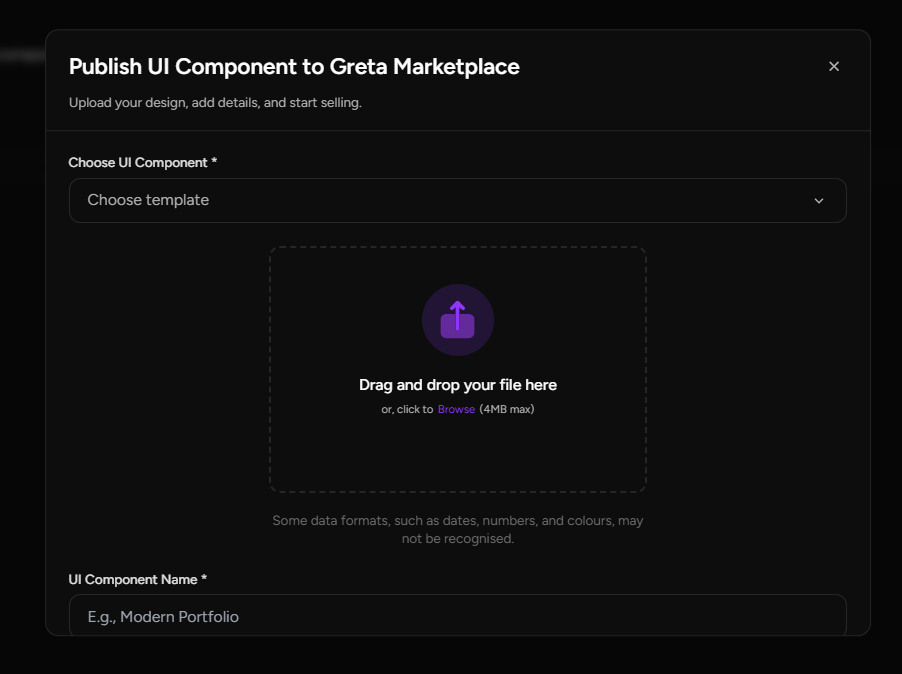
- A popup will appear: Publish UI Component to Greta Marketplace
Upload your design, add details, and start selling.

Step 8: Fill in Component details
Complete the following fields:
- Choose UI ComponentDrag and drop your file, or
Click Browse to upload
Max file size: 4MB - Some data formats (dates, numbers, colours) may not be recognised
- UI Component NameGive your component a clear and descriptive name
- Review all details carefully
- Click Publish
8. Review & Approval Flow
Step 9: Review status
Note: The review process usually takes around one week. You’ll be notified once the review is complete.
After publishing:
- Your UI component moves to Under Review status
- The Greta team reviews it for quality, usability, and reusability
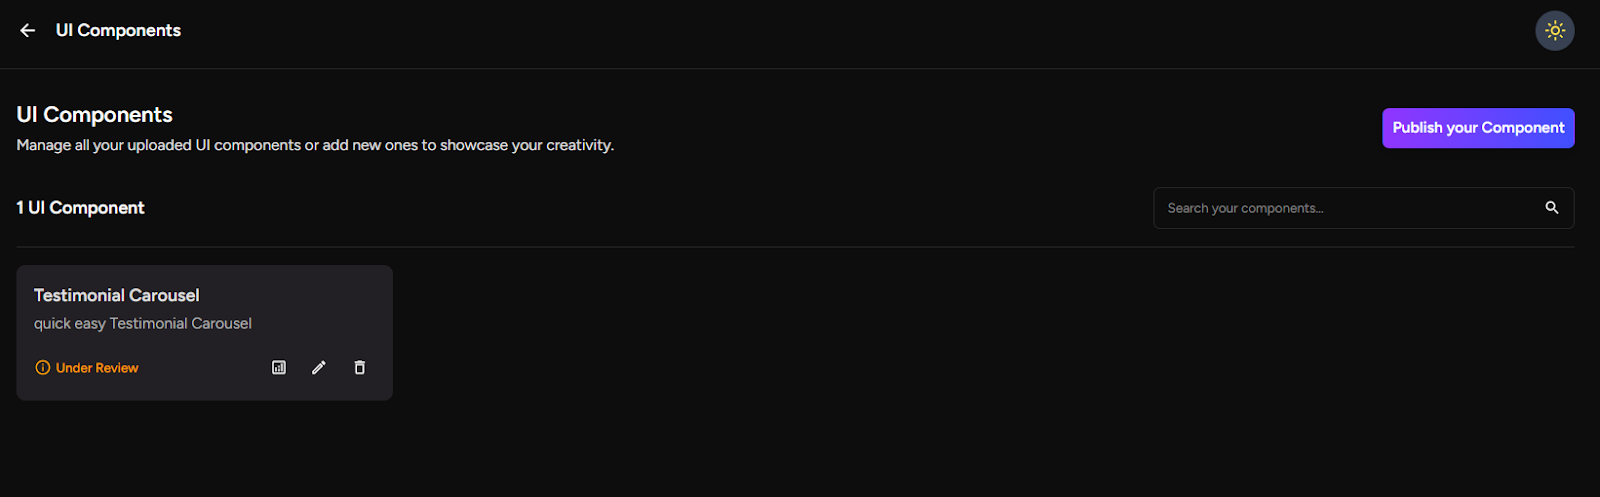
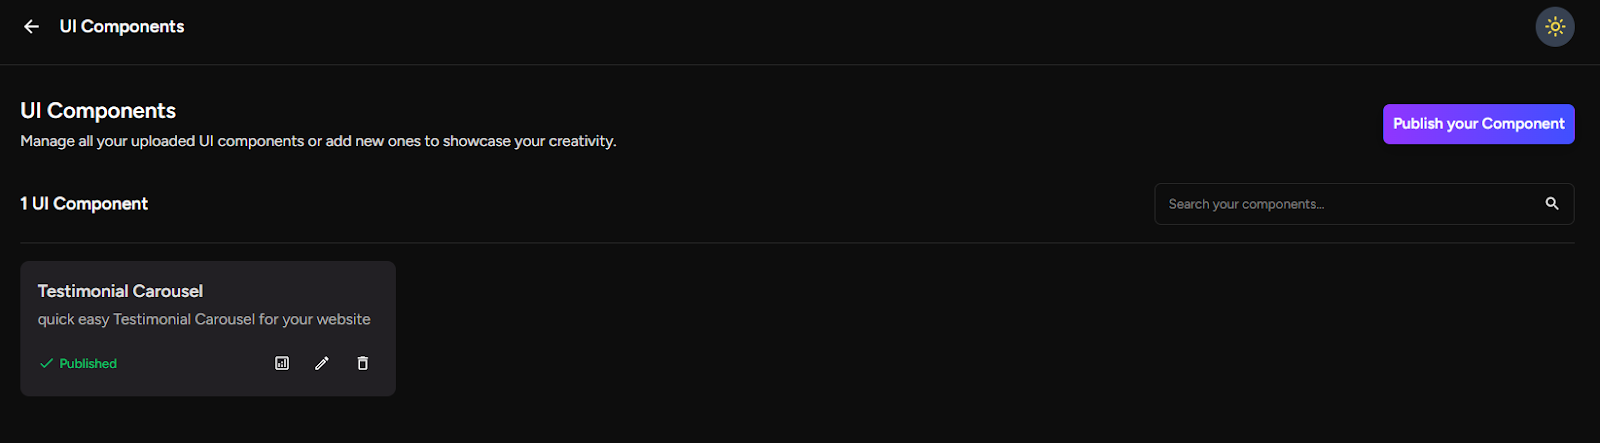
If approved:
- The component is published on the marketplace
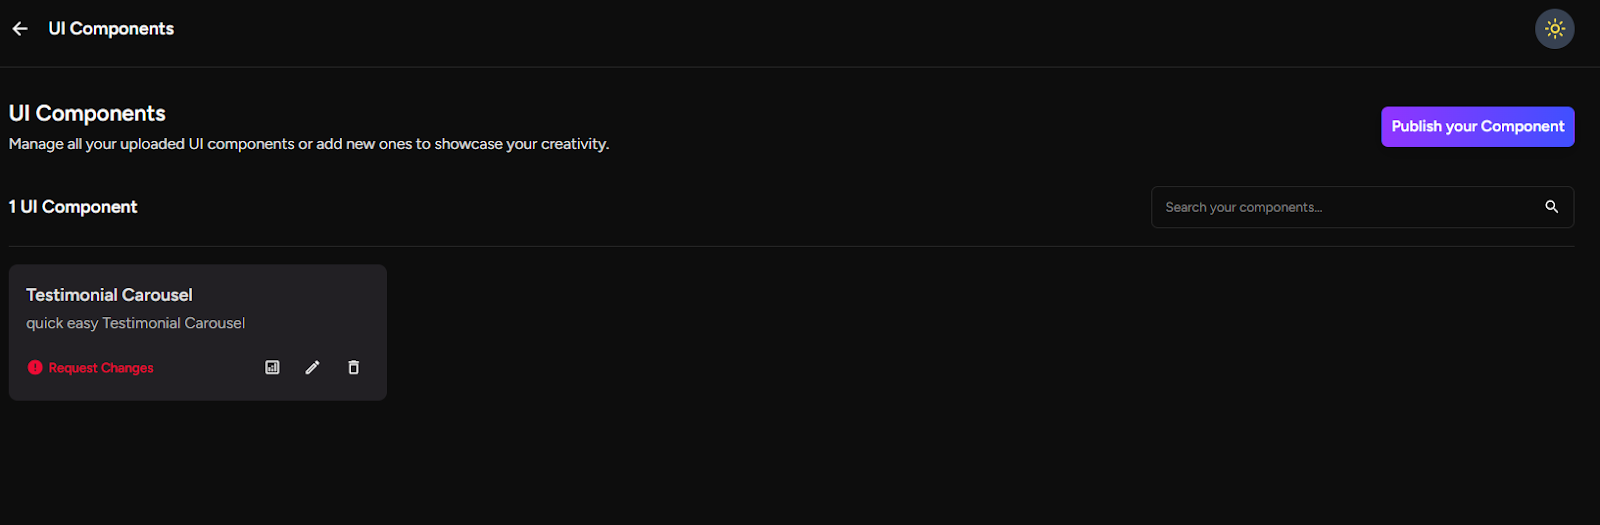
If rejected:
- Hover over the status in the dashboard to see the rejection reason
- Make necessary edits
- Resubmit the component for review
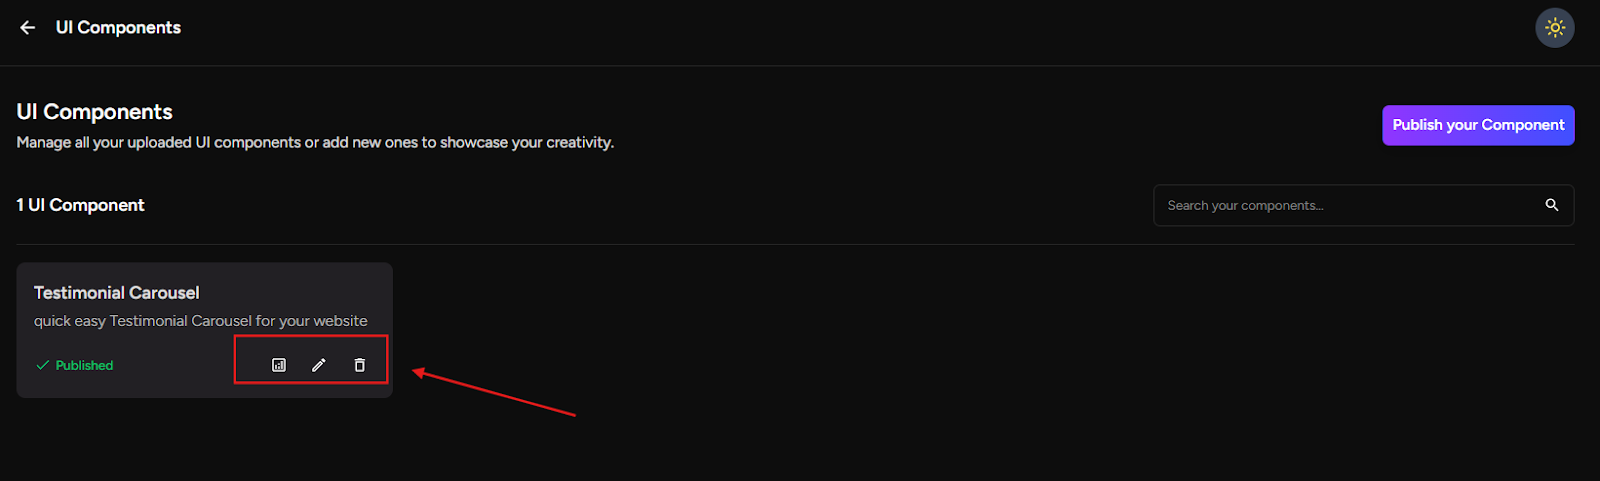
9. Managing Your UI Components
Step 10: Dashboard actions
For each app in your dashboard, you’ll see three options:
- Analytics – Track usage and performance
- Edit – Improve or update the component
- Delete – Remove it from the marketplace
You can manage all your UI components directly from the dashboard.
10. Discovering & Using Apps from the Marketplace
Step 11. Explore UI components
1. Go to the Greta Marketplace
2. Browse UI components created by other users
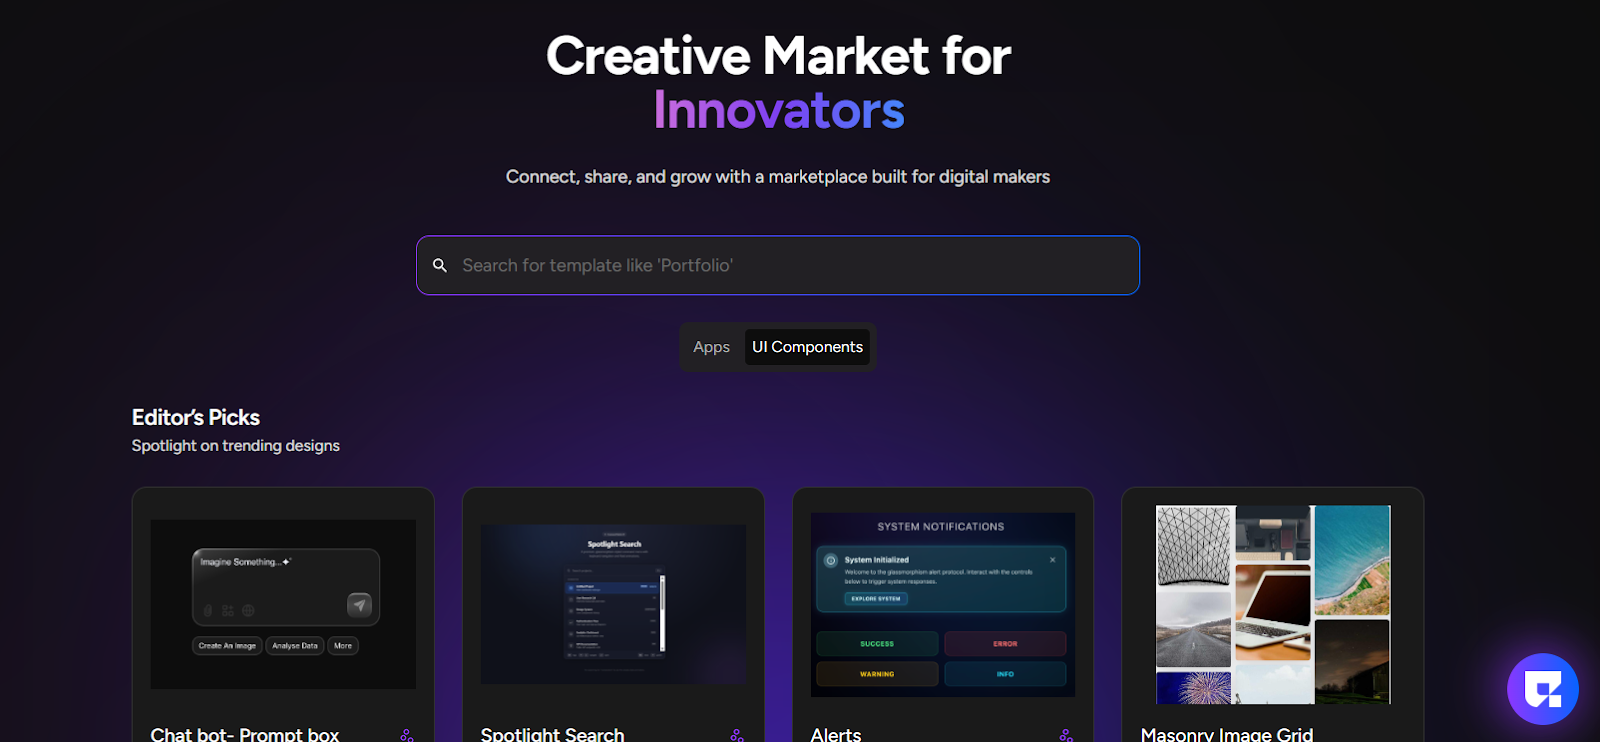
3. Click on any app to view:
Ratings and reviews
Likes and comments
You can:
- Like components
- Rate them
- Leave feedback
11. Using a UI Component in Your App
Step 12: Add a component to your app
1. Open the UI component you like
2. Click the price button (for example, $0 if free)
3. The component is automatically added to your History
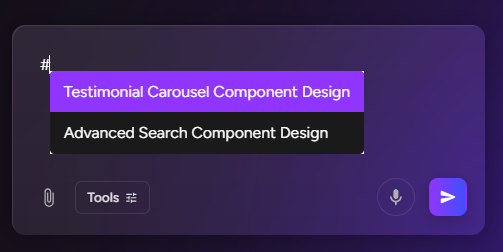
Tip: Use # in the chat to call the purchased UI component and guide Greta to place it exactly where you want inside your app.
From there:
- You can reuse it in your apps
- Customize it as needed
- Save time with ready-made UI elements
Final Notes
UI Components in the Greta Marketplace are designed to:
- Encourage reusable design
- Speed up app creation
- Help designers and developers grow through visibility and earnings
Build once. Reuse everywhere. Share with the community.